Sunday, May 30, 2010

Boy Gifts

My nephews are getting hard to make things for. I just don't think about boy stuff I guess. Here is what I came up with for my nephew who is entering the teenage years. Hopefully he is not to cool for it all.
He likes motorbikes, so I did motorbike appliques on this towel for him. It kind of took a long time because of all the stitching detail I added. It definitely needed it though because I didn't want it to look to little boyish. Anyhow, he is worth it so hopefully he likes it.

I added clothing detail with different stitching and thread colors. I like the way it turned out.

I also made him a tie which my husband is modeling here. I also hope this fits his style, but if not no big deal. He can use it to wash his bike with or something.

I need more teenage boy ideas. Any boy ideas for that matter. I am just so use to thinking girl that I get stumped on the boys.

Fathers Day for instance is coming up. I have no idea what I could make for my husband. He will not wear a handmade tie, so I can count that out. Any ideas?


Wednesday, May 19, 2010

Tank Turned into a Summer Dress Tutorial

Last year I bought two adult tanks on clearance at Old Navy for $2.50 each. It is made with some lightweight cotton type fabric. I am actually not sure what it is really . Anyhow, I bought it thinking I would make it into something for my daughter.

Now almost a year later I finally did it. I love how it turned out. I also decided to take on the challenge of making a tutorial out of it in hope that some of you can find a similar tank and do the same.

On to the tutorial! (Note: read all the way through before cutting and sewing).

This is the before picture. She thought it was fun just like this and I had a hard time getting it off of her. When I finally did these are the next steps I took.

First I put one of the tanks on the kid, and measured it to where I wanted it to sit and how tight around I wanted it to be. I marked them with pins. Essentially it was about 2 1/2" in on each side. It will probably be different for your child depending on their size.

Next each side of the tank, and also carefully cut off straps. You will have two pieces. The reason I cut them apart is because with the elastic back it just made it easier to get them cut right.

Make sure to pin your elastic on the back piece in place so you don't have to restring the elastic through.
Take the front piece, and fold it over right sides together and line up the edges.

Find your mark at the top from measuring the child, and cut at a diagonal. Do the same with the back piece of the tank.
Line up the sides, and pin them together. Sew sides with a 1/2 seam allowance.

Once your sides have been sewn it should look something like this.

If you have a serger you can finish it off like this. If not, then you can use a zig zag stitch to help finish it off.
Trim away any extra from the bottom.

Using the second tank top you will cut it into two parts for now. Carefully cut just under the elastic band through both front and back of tank. This will be the ruffle. Set the rest of the tank aside for the sleeves.
Now, you are going to slightly gather the piece you just cut off until it is the same size around as the bottom part of the dress piece.

After it is gathered to your liking you will pin the ruffle piece to the dress piece with right sides together. (This is where I forgot to keep taking pictures)

Finish it off with a serger or a zig zag stitch.

For the sleeves you will take the left over tank and cut the sides. Now you should have just the left over back piece. Mine had an elastic piece where I cut it away from the ruffle piece, as well as an elastic piece at the very top of the back.

Next cut this piece in half horizontally. You should have two long pieces each one having one elastic piece. If there is no elastic, measure from front to back on the child where the sleeves would go, and add 3-4 inches. Make a casing for an elastic and pull your elastic through your casing and sew it into place.

Once you have your elastic sleeves ready you will finish off the raw edges by folding and pressing a 1/4" seem and top stitching it.

Position sleeves about 3" in on each side and pin in place (the measurement or placement of the sleeves will vary depending on the child. Sew them on front and back.

Now, you should have a dress similar to the one I have made.


I apologize now for any confusion. If you have any questions feel free to ask. Next time I really need to remember all of the pictures.

Good luck repurposing.


Tuesday, May 11, 2010

Ruffled Linen Shorts

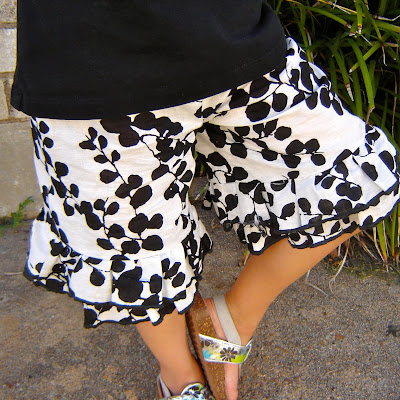
I love this fabric. I bought a lot of it because I could not get enough of it. I decided to make these ruffled linen shorts for my daughter to wear in the heat.

They were pretty simple to make except for the linen frayed like no other. That made it more time consuming. Plus my serger will not gather fabric anymore for some reason. I need to take it in and see what is up. Gathering by hand is way more time consuming and messy in my opinion because it always frays everywhere, or the thread breaks.
Other than that they were quite simple. I will try making some more and post a tutorial or something. I also have a tutorial for a cute red dress made from repurposed tanks. I might get that posted by the end of the week. Until then, have a fabulous week and I will try my hardest to get that tutorial asap.

Sunday, May 9, 2010

A Little Mother's Day

I am super happy to have the mother that I do. I am lucky that my mom worked so hard to provide for my siblings and I. She has been through a lot, but in return she has truly devoted a large part of her life to raising us and giving us what we needed.

I had originally planned to get a canvas print of my daughter, but then I procrastinated and didn't give myself enough time to get it done. So I just printed out the photos for now, and made these gifts up.

I made aromatherapy neck pillows for relaxing. They were really quite easy to make. It only took about 20 minutes. Maybe I should make a tutorial or something.
I have been wanting to make some of these fabric leaves for a while now. Mother's Day was a perfect chance to try them out. They were not as easy as the pillows, but they were rewarding once finished. Now I need to make some for myself.

I learned a few tricks to save time and make them nicer than the first try. I think they turned out great and hope they go well with the decor of the wonderful mothers in my life.

I hope you all have a great Mother's Day and wish your mom's a great day too.

Wednesday, May 5, 2010

Diaper Bags!!

I am in love with diaper bags. This diaper bag that is. Now if I just had that baby to go with it. Maybe you do?
I made a couple of these a while back for baby shower gifts, and just never got around to posting it. I want to make one for myself even though I don't tote around baby items at the moment. I just love it too much. I will probably make a few of these and stick them in my shop sometime so keep an eye out. I will keep you posted on that when I do have them ready.
This bag closes at the front like a messenger bag. It doesn't scream diapers, milk, wipes, etc. It just looks like a cute bag.
There are so many pockets. The pockets pictured above are on the inside of the bag. Other pockets include: one on each side with velcro closure, double pocket on the front, and a large zip pocket on the back.
It takes about a full day to get one of these finished. Subtract all of the distractions and it is still a good 5-6 hours. Although labor intensive this is still high on my list of favorites.

Sunday, May 2, 2010

Beach Towel for the Slightly Goth Chic

I have so many things to blog about. Unfortunately they have all been pushed aside since I am good at procrastinating.

Anyhow, I wanted to post pictures of this awesome towel I finished about a month ago for my niece. The lighting was not the best, and I think Black is hard to photograph with a cheap camera.
I love the way it turned out. Before making this towel I asked my niece who just turned 17 what she is into or would like that is handmade. I was afraid she might think something handmade was silly.

She wanted something a little edgy and slightly goth. So I took her favorite colors purple, black, lime green, and mixed them up.
I used this Amy Butler's Nigella Quilt free pattern download and shrunk it to fit my small block. You can find it here along with several other awesome free patterns. The letters were a pain, however, they were worth it because I love love love them.

Anyhow, I think she liked it a lot. Even if she didn't, I know I did.

I will be adding several other finished projects to the blog later this week.
Related Posts with Thumbnails