Cupcakes or Necklaces Anyone?

Near the end of the summer I purchased a few solid color shirts so that I could embellish them as I wanted to. The first on my list was an appliqued zebra that I will have to post a picture of later.
I had been wanting to make one of these ruffle cupcake shirts for my daughter who loves sweet things especially cupcakes. Whenever she is invited to a birthday party the one thing on her mind is the cake. So, she can indulge in this cupcake frequently without getting a sugar rush. I love how it turned out.

I do recommend using a stabilizer underneath so you can prevent mishaps like the right bottom corner of the cupcake. I couldn't unpick it or it would have torn the shirt up. So, it has a little beauty mark, but I like it. It seemed incomplete without a cherry on top, so I sewed a red button on top for the cherry.

I love making hair bows/flowers/barrettes to match shirts. I have not done it in a while, so this was a treat. I thought I would take some of the frosting like fabric and make a little frosted rosette headband to match.
Next up was a little freezer paper action. My daughter also loves these pretend necklace shirts that are pretty much in every store right now. I did buy her one for school, but I wanted to see if I could pull one off myself.

This is my take on the necklace shirt. I did not want to cut all these holes out of the freezer paper by hand, so I used my scrapbooking tools. I have not used them in so long, but they sure did come in handy. I used my eyelet hole punch thing, and made various different sized holes all over the outline I had for then necklace. I wish I would have had one that was a little bit bigger so that I could add a few larger circles.
If you are new to freezer paper stenciling, or you have never done it you should try it. I will try getting another project using it so I can make a tutorial. In the mean time there are tutorials all over the place.

Of course this one had to have a matching hair pin too. I used a lavender colored satin and made a little flower as you can see.
There are so many ways to add to a plain old shirt. I have so many ideas running in my head, but then I have to wait because a kid only needs so many t-shirts.
Do you have any fun shirt, skirt, or purse embellishment ideas?


 Don't mind the serious face above. My daughter is very shy, so it surprised me to see her willing to walk across the stage at the YMCA trunk-or-treat. This is her next to the real Hannah Montana, and the picture that we were inspired by. The jacket and boots where the only hard parts. I couldn't find a jacket pattern anywhere, and I looked for a white denim jacket to save time, but I think it must be the wrong season for that. So, I had to wing it and figure it out myself. I didn't put a zipper in it because by the time I got that far I was ready to be finished. She did help me bedazzle her microphone which helped out a bit.
  She had a lot of fun as Hannah Montana, and even Miley Cyrus for school because she couldn't wear her wig. I think next year I need to to something really easy going. Who knows who she will pick next year.
  My daughter decided that she wanted to be Hannah Montana for Halloween this year. So I finally went with it. She picked a picture and we tried to get it as close as we could. I will be posting the full costume later this week.
 The boots are made with a suede cloth in grey, and embellished with 4 buttons down the side and two ribbon ties at the back. The soles are soft and made with a non slip rubber. Lets just say that your kid would not want to go running around in a bunch of pebbles or twigs. P.E. might not be the best place for them either. I am sure that this sole would be perfect for smaller kids, but it would be nice to find something that was a bit more durable for the older ones.


 The ones on Childmade were done with an embroidery machine. I don't have one, so I set my sewing machine to a zigzag stitch, and little stitch width. It basically gives them the same look as the embroidery machine.

 A while ago I got together with some friends and learned to can peaches. I have been wanting to learn for a few years now, but I finally made the opportunity. Since it was so much sticky work, I decided to reward myself with some hot pads.
 I made my first set about a year ago, and gave them away of course. I have made several sets since then for gifts. Each time I make a set I think to my self that some new hot pads of my own would be really nice. The ones I had were nasty and stained/burned.


 I wanted to make a large one so that she could grow into it, or so that her dad could read with her on it. I used the adult size
 He likes motorbikes, so I did motorbike appliques on this towel for him. It kind of took a long time because of all the stitching detail I added. It definitely needed it though because I didn't want it to look to little boyish. Anyhow, he is worth it so hopefully he likes it.
 I added clothing detail with different stitching and thread colors. I like the way it turned out.

 Last year I bought two adult tanks on clearance at Old Navy for $2.50 each. It is made with some lightweight cotton type fabric. I am actually not sure what it is really . Anyhow, I bought it thinking I would make it into something for my daughter.

 First I put one of the tanks on the kid, and measured it to where I wanted it to sit and how tight around I wanted it to be. I marked them with pins. Essentially it was about 2 1/2" in on each side. It will probably be different for your child depending on their size.
  Next each side of the tank, and also carefully cut off straps. You will have two pieces. The reason I cut them apart is because with the elastic back it just made it easier to get them cut right.
 Find your mark at the top from measuring the child, and cut at a diagonal. Do the same with the back piece of the tank.


 Using the second tank top you will cut it into two parts for now. Carefully cut just under the elastic band through both front and back of tank. This will be the ruffle. Set the rest of the tank aside for the sleeves.
  Now, you are going to slightly gather the piece you just cut off until it is the same size around as the bottom part of the dress piece.
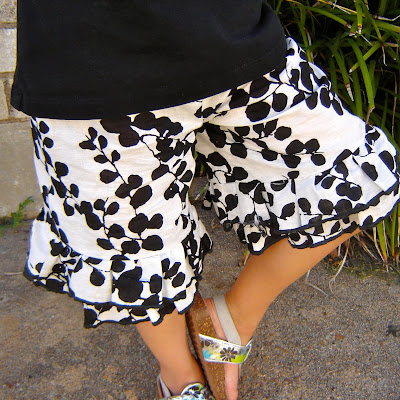 I love this fabric. I bought a lot of it because I could not get enough of it. I decided to make these ruffled linen shorts for my daughter to wear in the heat.


