Tuesday, December 8, 2009

Family Photo Shoot


The last couple months have been really crazy for me. I have been sewing non-stop, and blogging very little. It seems like I get halfway through a project, and think of 8 more awesome things to make. I think I just need to learn to relax a bit.

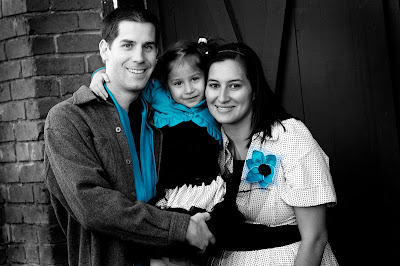
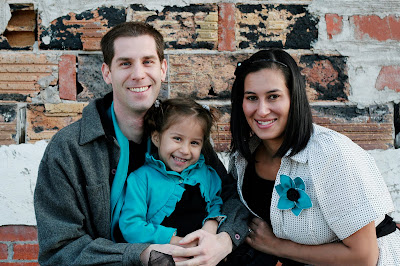
However, in the midst of all my crafting I finally made something for me. I spent several hours on making clothing for my daughter and I for our family photo shoot. My poor husband only got a scarf, it was all I could muster up for him.
Our great friend took several pictures in downtown Houston for us. We were going for a more urban fun feel, and I think she did great. Getting pictures taken is always hard for me because I am either too hard on myself, or I love way too many of them and can't decide. That was the case here, I am including several of my favorites because I just couldn't pick one to feature here on my blog. I need to learn how to make a collage or something.

This jacket has to be my favorite of all the items I sewed . It was not too hard, and turned out super cute. I think I will be making one in several colors because they are just so fun. Maybe I will put one up for a giveaway sometime. Definitely not until the new year. I need some relaxing vacation time.

Also I would like to come up with a tutorial of some sort, so if you have any suggestions I am open to your comments.


Well, I hope all of you enjoy your Christmas holiday. It is always so fun this time of year. I love creating traditions, and just enjoying the spirit of Christmas.

Have a safe and happy holiday.

Wednesday, December 2, 2009

Flower Brooch giveaway WINNER!!

Congrats to the Dalton Family who was #8.

I don't have your email or your blog, so you will have to email me by clicking the email button, or facebook me your info. Just let me know which one you would like.

Thanks to all who entered. Don't feel bad if you didn't win. I have never won a giveaway myself. However, I love doing the giving so, keep posted as I have some really cute children barrettes/bows to give away. I just have to take pictures first.


Sunday, November 22, 2009

November Giveaway!!


Hey All! In my last post I promised a giveaway this month. Well, although we are nearing the end of the month, I do still have a giveaway to do. The winner of this giveaway will receive one flower broach/pins as seen on the purses in my previous post here. Read on for giveaway details below.

A week or two ago the UPS man delivered a wonderful treasure to my doorstep. It was a package containing all of these sweet fabrics you see above. If you don't know, these are all Amy Butler and Joel Dewberry home decor weight fabrics.

It seems that the many people really liked the purses I donated in the auction, so I have decided to start making them and adding them to my etsy shop. I don't know how long or how many I will be making. There may be a short and limited supply. I plan to get them done asap, however, with Christmas sewing projects I can't give and exact time. If you want a custom purse order before Christmas you can send me and email or a convo through my Etsy shop.

Since I plan to make some sort of removable flower, embellishment, or something fun to to these purses I thought that a flower pin give away would be perfect.

So, to enter this giveaway simply leave a comment and random.org will provide a winner. The giveaway will end on December 1st at midnight, and the winner will be announced on December 2nd.

Good luck to all you fantastic readers.

Sunday, November 1, 2009

Purses, Kitchen Towels, and an Auction

This is what I have been up to in October.

OK, I know I should not be like this with my own work, but I simply can't help it. I absolutely adore these purses, and I think they turned out so fun and cute. I need to make one for myself now. I do need an upgrade from the one I am currently using.

So you may ask why I made them if I am not even planning on keeping one. Well, I have been making them as a donation to some dear friends of mine who are doing an online auction to raise funds for their two sweethearts who both need transplants.

I made the purses and the towel sets. I have also included just a few of my favorites from what is being offered to bid on for the auction. Check them out below, and then head here to see all the other awesome items up for bid.

The auction starts tomorrow November 2ND at 8:00 am and will end November 16Th at midnight.

So if you want one of these adorable purses, or any of my towels, simply check out the auction where they will be up for bid.
Pussy Willow Kitchen Towel Set

Tootie Frootie in Citrus
Cattails Kitchen Towels
Resting Bird Kitchen Towels
Standing Fern Kitchen Towels
Retro Meets Mod Kitchen Towels


I am not sure who donated this, but I think it is very cute. How fun to have a spiced up wipes container.


Please check out all the items up for bid. They will make great Christmas and birthday gifts and will also be helping out a family in need.

A Happy Halloween Costume


This is the one and only Halloween costume I made this year. I had plans to make one for myself and my husband, however, I have been very busy sewing other projects this month, and I just didn't have time to get them sewn.

I do love the results of this funky, slightly spooky, and fun witch costume. My daughter specifically said she didn't want to be a mean witch, so I added a little pink, purple, and green to make it less "mean". She loves it and will now have another dress up to play with.

The top is made from a repurposed velvet floral dress, and the rest was just kind of added on. I wanted to make ruffles on the top, and it worked great. She was happy and that is all I needed.

Now, next year I will start in August. That way I might get more costumes made.

It was a great night of Trunk or Treating and we have more candy than is needed. I hope yours was fun and worth it too.

Saturday, October 24, 2009

WINNER of the Pumpkin Giveaway!!

Ok, it was super fun to read about all your Halloween costumes. It is actually very entertaining to read comments that are left for me to read. So thank you for all your comments.

So, the lucky winner straight from random.org is #30. This is the comment that was left.

The Lawlor's said...

I have a cute story from just the other day.

My husband said to me "do you know where and when I go that gray and red striped sweater in our closet?"

I said "yes, I bought it for you at Old Navy along with your other ones"

He didn't remember that but is very excited to use it for his 'Where's Waldo" costume this year!


Congrats to The Lawlor's and thanks for the comment. Good luck with the Where's Waldo costume. You just need to email me your address so I can ship this to you. Just click on the email button for my email address.


To all you other awesome friends, I will have another giveaway in November I hope. I just need to think of something to make.

If you didn't win and would still like a pumpkin you can request a custom order in my etsy shop.

Wednesday, October 14, 2009

Pumpkin Giveaway!!

PUMPKIN GIVEAWAY
I absolutely love Halloween. I just love dressing up, and having fun. There are so many fun ideas out there. This year I have added an awesome witch, these pumpkins, a wreath, and some other little handmade goods to my decor. I will post a picture of my witch soon, because it did turn out pretty awesome.

My memories of Halloween as a child are very different than things are for kids now. At least in big cities. When I was little we went door to door with a pillow case to fill up with tons of goodies. No trunk or treating existed then. It snowed quite often on Halloween, or at least it was usually freezing.

Now, I live in a place that is hot and humid most nights. I still wonder why they sell those heavy fuzzy costumes in a place like this. The poor kid would roast to death. Oh, and carved pumpkins don't do well here either. They go moldy the next day. I think when I was little they just froze solid, so they were good until February. Please don't keep your decorations out past Halloween! It is still fun, and I still look forward to the spooky events that come with Halloween.

Keep scrolling for the giveaway.
Here it is, my first giveaway. I actually entered another giveaway for a cute little pumpkin, and I didn't win. So, I made my own and an extra one to give away. The giveaway will end on Saturday October 24th at 8:00 p.m. I will use random.org to find the winner. The winner will be announced on October 24th p.m..

Here's how you enter:

1) Leave a comment telling me your favorite costume as a child, or a halloween memory. Or you can just make any fun comment you wish.

2) For another Entry become a follower of this blog and leave a separate comment.

3)Check out this Benson and Claire's blog or their auction blog. Leave a separate comment about the auction.

4) Make a post about this giveaway on your blog and leave a comment with your name and if possible your blog link.

NOTE: You can enter the giveaway even if you don't have a blog. Simply leave a comment with your name and email address.

Friday, October 9, 2009

Awesome Giveaway!!


OK, so I still have yet to do a giveaway on my blog. However, you can go to Janey Mac Press and enter the giveaway on her blog. You could win this:Get on over there and enter for your own chance to win this awesome faux headboard.

Thursday, October 1, 2009

Gymnastic Leotard


What do you do when you need a leotard and all the ones at the gymnastic stores are super expensive.

Well, you make your own of course.

I could have done this a lot cheaper than I actually ended up spending. I had to do it twice because the first time I did not get the right fabric, and it would not stretch enough to go on. Then I went to High Fashion Fabrics and it made all the difference getting a 4 way stretch fabric. This one here if made right the first time ended up costing me only $15. The cheapest one I found at the store was $37 and went all the way up to $90. I like the cheaper version.

I think it turned out really cute, and now that I know exactly what fabric to use it will be much better for the next one. I love the look of the flower, however, it might be better to use a more flat one like an appliqued poppy or something instead. I think this would get in the way when on the bars if she were a little older.

Now, if I ever make another one, I will try and take pictures to make a tutorial. However, I don't know when and if it will happen, but just in case I do I will add a tutorial for it on this blog.

Monday, September 28, 2009

Scrapbox Giveaway!!

Here is and awesome contest that you all must enter. What fabulous things I could do with this. Juas head here for the entry.

index.php.jpg

Tuesday, September 22, 2009

Bright, Bold, and Beautiful

So, Laura over at Bright, Bold, and Beautiful has featured me on her blog. I am so excited. A great blog worth looking at! You can view my feature on her blog by clicking here.

Enjoy.

Thursday, September 17, 2009

Funky Flower Shelf

Visit thecsiproject.com


Here she is, my first tutorial. I just have to warn you that I was making this at night, so the pictures are dark, and somewhat blurry. I hope to get better ones for my next tutorial.

I have been wanting a cute shelf for my daughter's room for over a year now. When I was at Michael's one day I found this unfinished wood shelf in the clearance section for $3.00. It was missing the glass and backing to the picture frame cut outs. It has been sitting in my closet waiting for some inspiration.

Well, now I finally have it finished, and I love the way it turned out. It was her idea to paint it Fuchsia, and it was a mighty good decision for our white walls. It matches the quilt I made her which I will try and get a picture of some other time.

So, here it goes:

1) I didn't think of doing a tutorial until after I had mine painted, but you will first want to cut a piece of cardboard, chipboard, or poster board that will fit inside the back of the openings. If yours comes with a backing you can just use that instead of cutting your own.

You will probably have to do at least two coats of paint.

Now, While your paint dries move on to the next few steps involving fabric.


3)Cut a piece of fabric to cover both sides of your backing. If you don't mind a messy backing on your shelf, you can save on fabric and use only enough to cover the front and the edges.

Cover your cut out backing with your favorite fabric. Just wrap it like a present, but use hot glue or mod podge instead of tape.


Below is a picture of what mine look like on the back. Mine are not perfect because I assume my shelf backing will be against the wall.


4) You need to make 1 for each opening. Mine needed three. I used a different fabric for each one, but you can do all three the same fabric, or the two ends the same with a different one in the middle. Whatever you like.


5) These flowers are super cute and even better is they are super easy. I followed the tutorial on Heather Bailey's blog. You can find it here to follow it and make your own. They really take about 5 minutes to make.

6) Once your paint is dry you will rough up the edges a bit. You can do as little or as much sanding as you want. I just did a little here and there where I thought it would look good.

7) This next step is how you get the two color effect. First dip your sponge brush in a little paint. You do not need a lot.

Now, CAREFULLY dab paint onto the parts that are sanded. It is OK to get it on the pink too. Just don't go painting the whole shelf the second color unless you want it to stay that way.

note: it is best to do one strip of sanded edge at a time so the paint doesn't dry. You can try it on the back of the shelf for practice. That is what I did.


Here is a picture of the first painted section.


8) Using a damp cloth CAREFULLY wipe the paint back off. Pay special attention to get it off the unsanded parts. I had to rub a bit on some of the pink to get the blue back off. When I say carefully wipe the paint off, I am referring to the sanded part. You want to be careful not to wipe too hard, or it will take the dye out of the wood, and it will just look like unfinished wood. You want to wipe enough of the paint off to make it look like the woods original color is blue or whatever color you are using.


Make sure to finish off all the sanded edges so they match.

9)Put your fabric covered backings into the openings, and secure with the metal tabs that are already provided on most frames. My shelf already had them in there.

Once those are secure, simply attach the fabric flower to the center of each opening front with hot glue.

10) Congrats, you made it through my first tutorial. You should now have a fun and spunky flower shelf. Keep in mind that this can be done with warmer colors and fabrics to match your other home decor.

If you have any questions about this tutorial or anything else, feel free to make a comment, email me, or visit my etsy shop.

Thursday, September 3, 2009

What You Can Do With a Serger

Yes, Yes what you see above is my very own serger. I finally treated myself to this wonderful machine. I have really only used it 2 1/2 times so far, but I am already in love with it. It just makes sewing so much easier and nicer looking.

Below is a picture of the first project I made with the serger. This was used as a practice piece for a shirt I am now making and will post pictures of later. It turned out cute for the most part. I am glad I practiced on this one first because there were a few things I did wrong, but they aren't too noticeable.
This 3rd picture is a little outfit I made for my daughters school attire. I used a pattern that my friend lent me for the pinafore top. I made up some simple shorts with ruffle bottoms to match the top. I did not use my serger for the top, just my sewing machine.

However, One Super awesome feature of this serger is that it gathers fabric. In fact once I get a steady hand on it I can actually gather something while serging it to another piece of fabric. That is what I did for these shorts I gathered the pink fabric at the same time it was being serged to the brown/pink fabric.
I love things with ruffles and gathers, but it is such a pain on my machine to baste and pull in order to gather. Now I will be making gathers all the time.

These shorts were so simple with or without a serger, that I am going to make a tutorial and post it. Keep an eye out, and maybe in the next few weeks I will have it ready.

Tuesday, August 25, 2009

Christmas Already!!


I know, it is not nearly Christmas time yet. However, this idea came to mind a while ago for a wedding gift, and I just could not resist putting it up for grabs in my shop now. It would have seemed like a long time to wait to put them up in November.

So, inspiration was drawn from the super duper cute fabrics by Anna Maria Horner's Chocolate Lollipop collection which I had pictured below in my last post. I love them and I think they turned out fun and cute.

Now if I could just figure out the camera, they would pop even more with color.

It is not too early to get your hands on these as they would make great gifts, and they will warm up your kitchen for the holidays which are just around the corner.

I might have to get some Halloween ones made up soon. Hope you enjoy.

Wednesday, August 12, 2009

Yummy Fabric!

Ok, so I got this stack of fabric in the mail the other day. What can be better than getting a package in the mail? I knew it was coming of course, and expecting the arrival. Here it is waiting to be used. I look forward to making some new kitchen towels.

Of course some of the fabulous fabrics I already use, and simply needed to restock my supply. However, I did get mostly new fabrics from Anna Maria Horner. I love bright fabrics. Now if I could just at these bright pieces to my own home decor somehow.

Oh, and stay tuned to this blog as I will be doing a giveaway soon.

Thursday, August 6, 2009

Fanny Packs are Back! Or Are They?

Ok, so we are going to Disney World in September, and I was thinking that I might need something that is hands free to put all my junk in. Fanny packs came to mind, but the scary ones from my childhood in the 80's. Mine was florescent pink and neon green, and it was the bulgy scary looking type.

I decided to try a more modern version of the fanny pack. This is what I came up with. What do you think? My husband says it is still cheesy, so I need some honest opinions here.

I am not planning to wear a fanny pack for the rest of my life, so that is why I made it work three different ways. 1) With a long strap tied to each side made for across the shoulder. 2) Attatch a smaller tie and it becomes a wristlet. 3) Use the buckles sewn on the back or the ones on the side for a belt like fanny pack.

The inside is complete with a pocket for my cell phone, chap-stick, and a key ring.

I also made a matching slim wallet for my cards, a pen, and receipts. I really love this one! Oh, and I must not forget to mention that this fabric was thought up by my good friend Jodi. I was planning to make a skirt with the fabric, until I got it in the mail and I realized I ordered canvas instead of regular quilting fabric. Oh Well.

Anyhow, the fanny pack may not be back yet, but I think it was a good effort, and a great creation nevertheless. If you are lucky someday I will figure out how to make a pattern or tutorial to post on this blog and then you can make your own fanny pack.

Related Posts with Thumbnails