

Here is a great idea for a baby shower gift. I made this diaper changing set which includes a burp cloth, changing pad w/tie, and a bag to put the wipes and diapers in. My fellow etsy friend sells these on her Teacher Mom etsy shop along with some really awesome Toss n' Play balls. Head there if you would like to take a gander and possibly purchase one for an upcoming baby shower.

 Don't mind the fog that is in the picture from the humidity here. This turned out really fun. The great thing about quilting is that when you grab a bunch of fabrics and put them together it doesn't matter if they go or not. Somehow they all just come together and look like they were meant to be together in the first place.
 There is still a quilt pattern I want to try with all of my scraps of fabric that in no way match, but I am sure it will end up like this and look good once the pieces come together. It is like a fabric soup I suppose.

 I was so excited when I found the pattern for Oopsie the Octopus that was posted two days ago from Mellie and Me. I love their patterns and went right to work as soon as I saw her pattern posted. Go check it out here if you want to give this cute little Oopsie the Octopus a try for yourself.

 I was so excited when I found the pattern for Oopsie the Octopus that was posted two days ago from Mellie and Me. I love their patterns and went right to work as soon as I saw her pattern posted. Go check it out here if you want to give this cute little Oopsie the Octopus a try for yourself.
 I didn't do the patchwork like she suggested simply because I was using scraps of fabric from the diaper changing kit. I think he turned out cute. Thanks again Mellie and Me for the great pattern/tutorial.


 I wanted to make a large one so that she could grow into it, or so that her dad could read with her on it. I used the adult size
 He likes motorbikes, so I did motorbike appliques on this towel for him. It kind of took a long time because of all the stitching detail I added. It definitely needed it though because I didn't want it to look to little boyish. Anyhow, he is worth it so hopefully he likes it.
 I added clothing detail with different stitching and thread colors. I like the way it turned out.

 Last year I bought two adult tanks on clearance at Old Navy for $2.50 each. It is made with some lightweight cotton type fabric. I am actually not sure what it is really . Anyhow, I bought it thinking I would make it into something for my daughter.

 First I put one of the tanks on the kid, and measured it to where I wanted it to sit and how tight around I wanted it to be. I marked them with pins. Essentially it was about 2 1/2" in on each side. It will probably be different for your child depending on their size.
  Next each side of the tank, and also carefully cut off straps. You will have two pieces. The reason I cut them apart is because with the elastic back it just made it easier to get them cut right.
 Find your mark at the top from measuring the child, and cut at a diagonal. Do the same with the back piece of the tank.


 Using the second tank top you will cut it into two parts for now. Carefully cut just under the elastic band through both front and back of tank. This will be the ruffle. Set the rest of the tank aside for the sleeves.
  Now, you are going to slightly gather the piece you just cut off until it is the same size around as the bottom part of the dress piece.
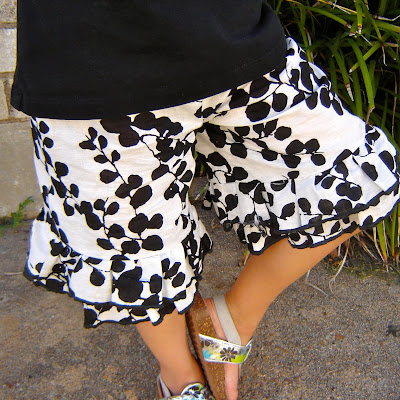 I love this fabric. I bought a lot of it because I could not get enough of it. I decided to make these ruffled linen shorts for my daughter to wear in the heat.


